Atraumatic Injections
When I started dental school I felt I would enjoy nearly all aspects of the work. The one thing that bothered me though was the idea of causing pain when numbing people or doing other procedures. I credit Dr. Henry Clarke for teaching us how to do atraumatic injections in his anesthesia class. Looking back at my dental education, I have always felt that his class was the one which most helped me enjoy taking care of patients. I have learned other techniques along the way, which coupled with all that I learned from Dr. Clarke, allow us to do most injections comfortably. Other teachers I have learned from include my mentor Roger Lawrence and pediatric dentist Josh Wren.
Below are eight techniques which we routinely use. I hope by explaining them that this will help alleviate patients’ anxiety about local anesthesia.
Overview:
- Compounded topical anesthetic
- Pressure anesthesia
- A tiny needle
- An anesthetic that is not acidic
- Slow injection technique
- Standard anesthetics
- An incremental technique
- A technique for injections on baby teeth (for kids)
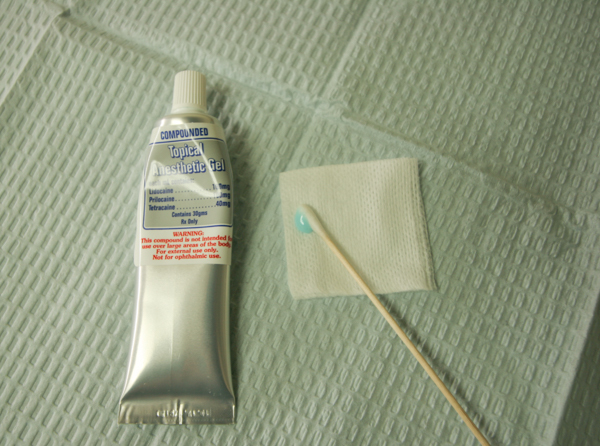
Compounded Topical Anesthetic
We use a topical anesthetic before any injections. This is a highly concentrated anesthetic gel that is rubbed into the area where the injection will go. It penetrates about 1.5 mm into the soft tissue. A common topical formulation is 20% benzocaine ointment. This is what I used until I learned about another option several years ago. Now we have a topical anesthetic that is compounded by a pharmacy that is more concentrated and has three types of anesthetic in it (10% lidocaine, 10% priolocaine, and 4% tetracaine). It is in a gel form and I think this water-based carrier is able to absorb into the tissues more easily. It costs our office about 10x what basic topical anesthetics cost, but I feel it is well-worth it as this by itself has greatly improved many patients’ experiences here.
Pressure Anesthesia
Sometimes an injection into the palate is needed. When I have to numb this way (e.g. when extracting upper teeth), I use pressure anesthesia. Basically, I put topical anesthetic on a Q-tip and then press it for at least one minute into the soft tissue where I will be injecting. The constant pressure desensitizes the nerves in this area. In addition, the topical anesthetic works to numb the area prior to the injection.
A Tiny Needle
I hesitate to put this detail in this post as I know there are many people who are severely afraid of needles. I have to admit, when one is about to be used on me, I get pretty nervous too! It might be best to not read this paragraph if you have a needle phobia. That being said, we start all injections with the smallest needle thought to be safe. It’s a 30 gauge and it is extremely small. This helps in several ways. One, less tissue is touched when it goes in. Two, it can be placed so that it penetrates very superficially in the area that is already numb from the topical anesthetic so that the patient often doesn’t feel anything. And three, it aids the slow deposition of the anesthetic (more on that later).
An Anesthetic That Is Not Acidic
One of the things that can hurt with injections is that many anesthetics are acidic. Epinephrine is used in many anesthetics because it prolongs how long the anesthetic stays in an area and it makes the anesthetic more effective. When epinephrine is included in an anesthetic formulation, a special preservative is added to the anesthetic to preserve the epinephrine. However, this preservative is acidic and it makes the anesthetic acidic. This acidity often is what causes “the burn” that patients feel when anesthetic is injected.
To fix this problem, we start nearly all injections with a non-acidic anesthetic. The one we most often use is called Citanest Plain (4% prilocaine). It doesn’t have epinephrine in it so it is not acidic. We inject this first before any other local anesthetics are used so that they patient doesn’t get the burning sensation. Once this anesthetic has some time to work, we follow it with a standard anesthetic that will numb the patient for the amount of time we need.
Slow Injection Technique
Slow injections help a lot for reducing patient discomfort. One nice thing about injecting anesthetic is that if you go slow enough, you can keep the anesthetic ahead of the needle thereby keeping the patient from feeling the needle. (This doesn’t work for things like vaccines where the liquid deposited doesn’t numb at all.) Another way that slow injections help, particularly where a doctor is injecting an acidic anesthetic is that the slow deposition is usually completely comfortable (it is when acidic anesthetic is injected quickly that patients feel the burning sensation). And finally, there can be issues with tissue expanding too quickly if anesthetic is injected quickly. If injections are done slowly, the anesthetic has time to work as tissues are being stretched, and it stays comfortable for the patient.
Standard Anesthetics
In regards to using anesthetics that effectively numb, I wanted to mention that we keep several options in stock. The anesthetic we use most often, which is often referred to as the “gold standard anesthetic” is 2% lidocaine with 1:100k epi. This anesthetic has a long-standing record of being safe and effective. Other anesthetics we keep on hand (there are times that others work better for various situations) are Marcaine (a long-acting anesthetic), Carbocaine plain (a short-acting anesthetic), 2% lidocaine with 1:50k epi, and Septocaine with 1:200k epi.

An Incremental Technique
I often use an “incremental technique” so that I don’t have to inject straight into a patient’s palate. Even with the pressure anesthetic technique mentioned above, a palatal injection can be uncomfortable. To start, I do normal numbing on the cheek/lip side of a tooth. Once it is completely numb on that side, I inject from the cheek side into the gum so that the anesthetic spreads to the palatal side. This will very effectively numb the gums on the palatal side of the tooth without having to inject straight into the palate. I have had patients tell me that they have had dentists inject straight into their nasopalatine canal (the bump on the top front of the mouth). This is extremely painful. I have never actually had to inject straight into this area without it already being numb, because I have always been able to use this incremental technique to numb the area first.
A Technique for Injections on Baby Teeth (for kids)
This technique works particularly well for numbing baby teeth, though sometimes I will use it on adults as well. The tissue near the gums is very thin and works very well for this technique. This area is dried, and then I rub the topical anesthetic on it for about two minutes. Next I inject into this area. It is rare that the child will feel anything when it is done this way. (About 1 in 20 think they feel something.) I then use incremental techniques to numb the teeth. I think some dentists feel this type of approach takes too long when working with kids, but I have found I get much better cooperation from kids when I can keep the procedures comfortable for them.
Conclusion
I hope that by explaining these procedures patients can better understand what we do to make things as comfortable as possible here. Everything I do I have learned from someone else, so this may possibly help another dentist as well.
If you have any questions or would like to hear about other modalities, please let me know.
— Ken Wylie, DMD